
The jack-o’-lantern is a lot more than meets the eye.
Today we see the goofy faces carved into pumpkins and while they look nothing like the vegetable lanterns that were used in the old days, they’re still pretty creative. The origin story of the jack-o’-lantern as we know it dates back roughly a hundred years from Irish folklore:
It tells of a maliciously clever man called Stingy Jack who tricked the Devil into not taking his soul when he died. When he eventually did, he was not allowed into Heaven for leading a cruel life. The Devil, keeping his promise, would not allow Jack into Hell. Thus Jack had no choice but to wander the Earth without a place to rest - lighting his way with a carved turnip lit by fire. The legend says Irish folk would carve vegetables to ward off wandering spirits like Jack. Pumpkins would only start being used after Irish immigrants discovered them in America.
Spooked yet?
Well, don’t worry, the REAL REASON we craft jack-o’-lanterns nowadays is quite simple:
It’s a lot of fun!
And despite some people managing to carve literally ridonculous works of art on them, we like the simple and easy stuff. Let’s get started!
The Materials

With these in hand you can start crafting a jack-o’-lantern right away:
- 1 pumpkin (turnips also work, but pumpkins are easier to carve and look nicer)
- 1 medium spoon
- 1 small knife
- 1 bowl
- 1 permanent marker or dry-erase marker
- 1 candle or tea light
- 1 lighter
- 1 small LED candle (optional)
- newspaper (to use as working area)
Alternatively, you can acquire a Pumpkin Carving Kit that comes with the perfect scooping and carving tools!
Choosing a Design
The easiest way to find a good design is to simply look online and save the one you like. Then you can either:
- Copy it by hand directly onto the pumpkin, or
- Print it, cut the outline, and draw around it on the pumpkin to make a perfect copy
Here’s a selection of 8 beautiful designs you can use on your pumpkin:
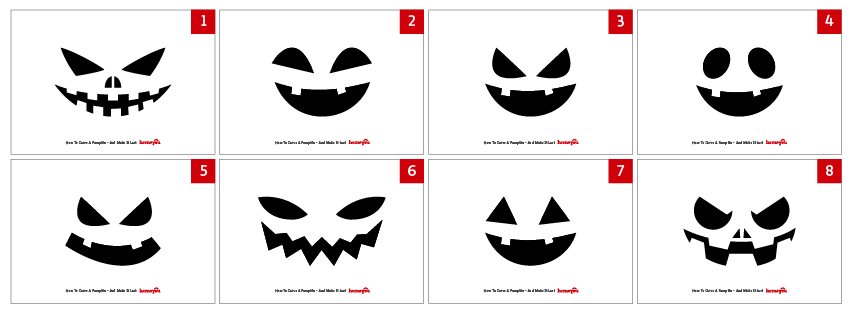
Click on the following button to save all of them at once!
![]()
Time to Start Carving!

BEFORE YOU START: pumpkins are perishable. You can purchase them a week before Halloween with no problem and refrigerate them for safekeeping, but once you start carving, they tend to go bad quickly (in two or three days). Wait to carve your pumpkins the day before putting them out for display!
Step 1: Preparation
Lay the pumpkin over the newspapers (or wherever your working area will be), and cut a circular hole around the stem with the knife.
Be sure you use the knife to cut at an angle towards the center of the pumpkin: we need the stem to fit back in there later, and by doing it this way, it won’t fall inside the pumpkin!
Step 2: Scoping
Scoop the insides of the pumpkin with a spoon and put them in a bowl - you won’t be needing them anymore.
Be sure to scoop EVERYTHING out. You don’t want the remains getting moldy and smelly!
Tip: If you love pumpkin seeds, you can make them yourself after scooping out the insides! Here’s a super easy recipe!
Step 3: Drawing
Choose the best side of the pumpkin and sketch your design with a permanent marker or dry-erase marker. The latter is preferable, since it’s easier to erase and redraw if you make a mistake, and just as easy to wipe off once you’re done cutting.
Step 4: Carving
With a knife, cut over the lines you’ve drawn. Be very gentle and careful - you want to keep the knife steady to cut along the lines. Don’t press too hard (otherwise the knife could slip) and always cut pointing away from the hand holding the pumpkin in place.
If the carvings don’t fall off naturally after cutting, simply press them inwards or outwards (whichever is easier) to make them fall off.
Step 5: Let There Be Light

It’s time for the final touch: if you decided to go for a candle or tea light, simply light them up with the lighter, put it inside the pumpkin, and put the stem back on the carved hole.
Be careful to not let the flame touch get too close to the stem - a tea light or a short candle is preferable in this case.
Another safer option is using a LED candle: they produce no heat, offer no fire hazards, work without the need for outlets and are usually very cheap. You can find packs with 24 units for less than 10 bucks. Oh yeah, and they last for an eternity, so don’t worry about it going off.
And… you’re done!

Follow us on Facebook for more awesome tips and tricks! And send us pictures of your pumpkin carvings if you try it!
Keep on reading:
12 Hilarious Fails to Avoid This Halloween
How to Decorate and Celebrate Halloween as a Family
13 Must-Watch Movies For This Halloween
10 DIY Halloween Decorations You Can Do In Under 30 Minutes
23 Easy and Tasty Halloween Treats